
- Установка программ в Manjaro Linux
- 1. Установка пакетов Manjaro через графический интерфейс
- 2. Установка пакетов с помощью pacman
- 3. Установка пакетов с помощью yaourt
- Выводы
- Contents
- Font paths
- Fontconfig configuration
- Presets
- Anti-aliasing
- Hinting
- Byte-Code Interpreter (BCI)
- Autohinter
- Hintstyle
- Pixel alignment
- Subpixel rendering
- LCD filter
- Advanced LCD filter specification
- Custom settings for certain fonts or font styles
- Replace or set default fonts
- Whitelisting and blacklisting fonts
- Disable bitmap fonts
- Disable scaling of bitmap fonts
- Create bold and italic styles for incomplete fonts
- Change rule overriding
- Query the current settings
- Applications without fontconfig support
- Troubleshooting
- Distorted fonts
- Calibri, Cambria, Monaco, etc. not rendering properly
- Applications overriding hinting
- Applications not picking up hinting from GNOME settings
- Incorrect hinting in GTK applications
- Helvetica font problem in generated PDFs
- FreeType breaking bitmap fonts
- Debugging FreeType fonts
- Установка приложения из tar.gz
- Установка приложения из SVN
- Установка приложения из CVS
- Установка приложения из RPM
- Компиляция
Manjaro — самый популярный дистрибутив GNU/Linux, как минимум, в течение последних месяцев в рейтинге Distrowatch. Причин для этого более чем достаточно. В статье будет рассмотрен один из несомненных плюсов системы, который по удобству, качеству и простоте является одним из самых привлекательных для пользователей, — установка программ в Manjaro.
Стандартной средой рабочего стола в Manjaro является Xfce. Именно в ней мы опробуем два варианта установки ПО: графический и с помощью терминала.
Установка программ в Manjaro Linux
Manjaro имеет собственный список источников программного обеспечения, рядом с которым также работает репозиторий Arch (в том числе и пользовательский репозиторий AUR).
1. Установка пакетов Manjaro через графический интерфейс
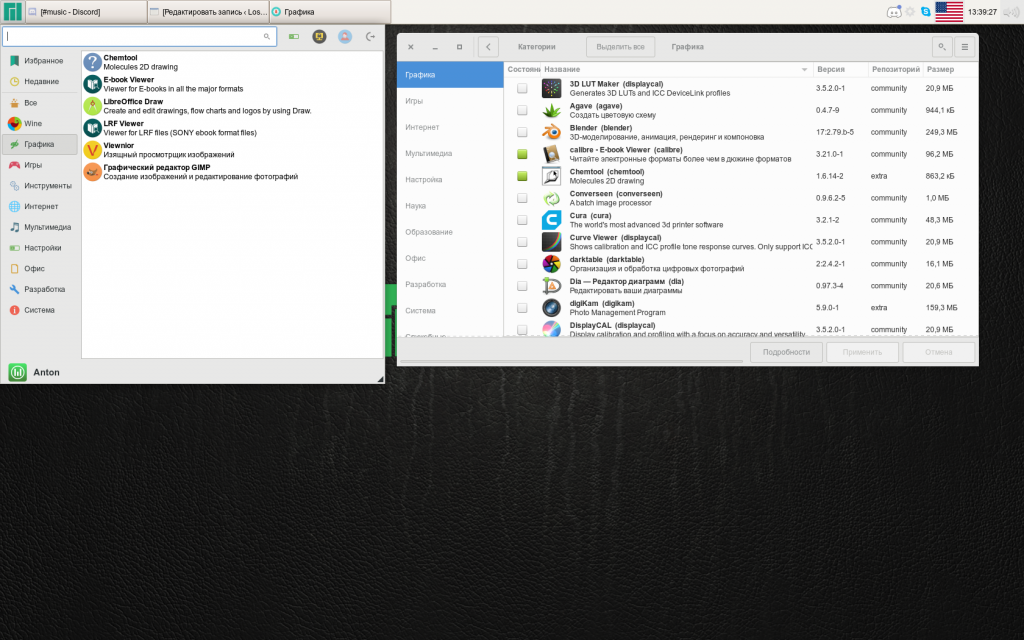
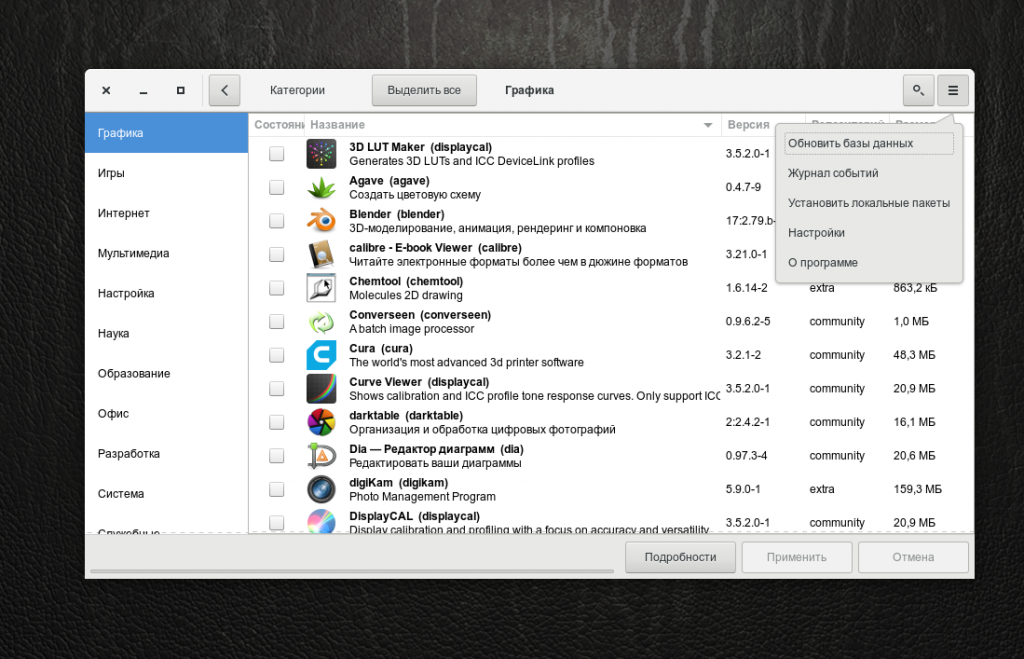
По умолчанию система использует pamac в качестве менеджера управления программами, которая является графическим вариантом консольной утилиты pacman, о которой будет сказано позже. Он может работать одновременно со стандартным репозиторием и с AUR.
Чтобы запустить его, откройте меню Xfce → Настройки → Установка и удаление программ (или воспользуйтесь поиском).
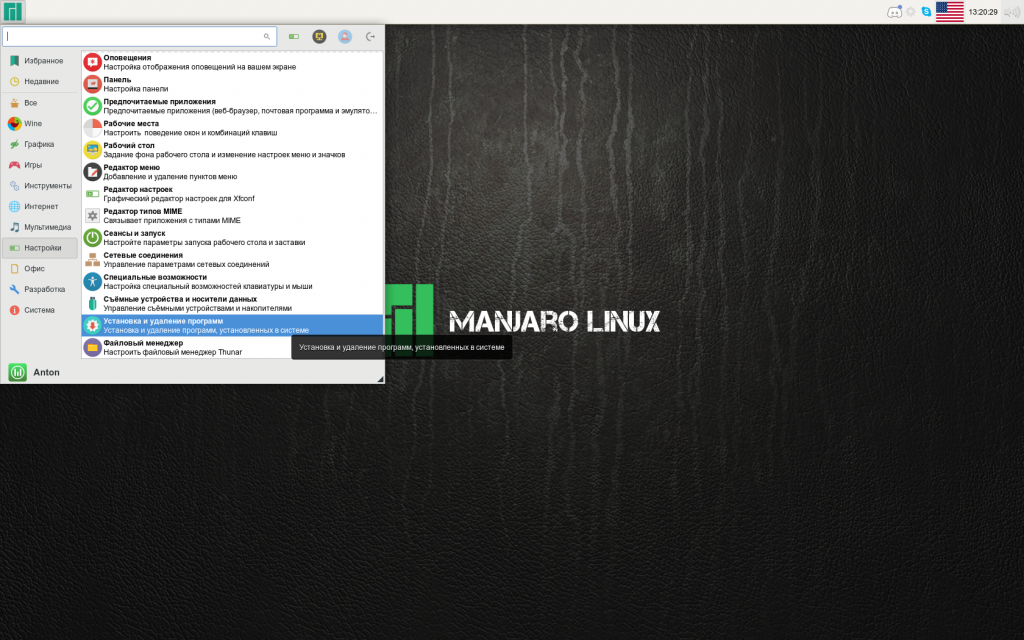
Pamac имеет схожий с подобными программами интерфейс, в котором есть возможность сортировать все программы по категориям, группам и т.д.
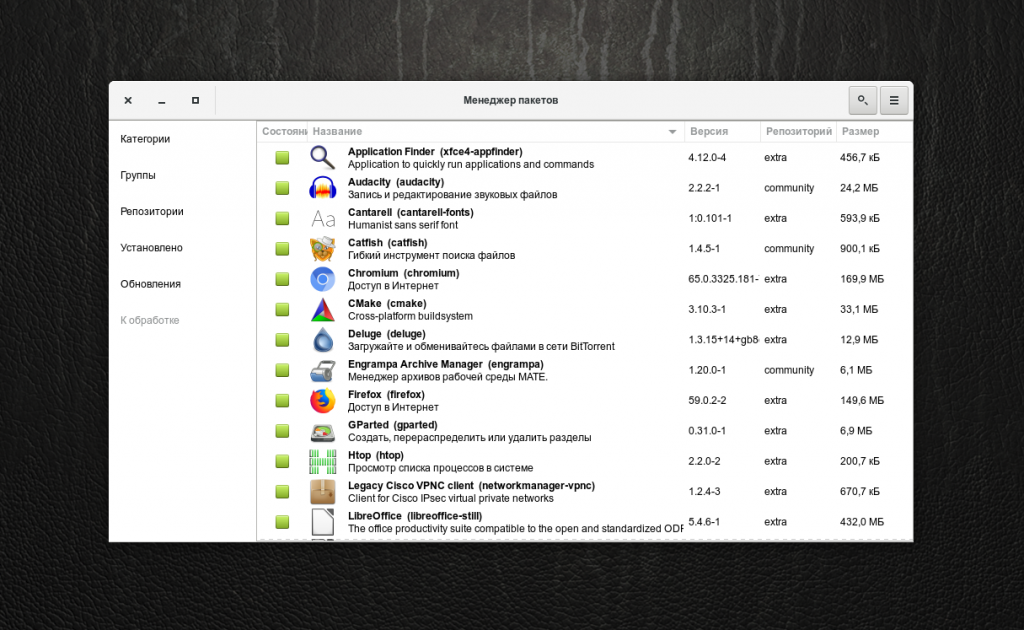
Установленные программы имеют окрашенное зеленым цветом поле Состояние. Чтобы установить программу Manjaro, выберите необходимый фильтр ПО (например Категории). Укажите один из предложенных разделов:
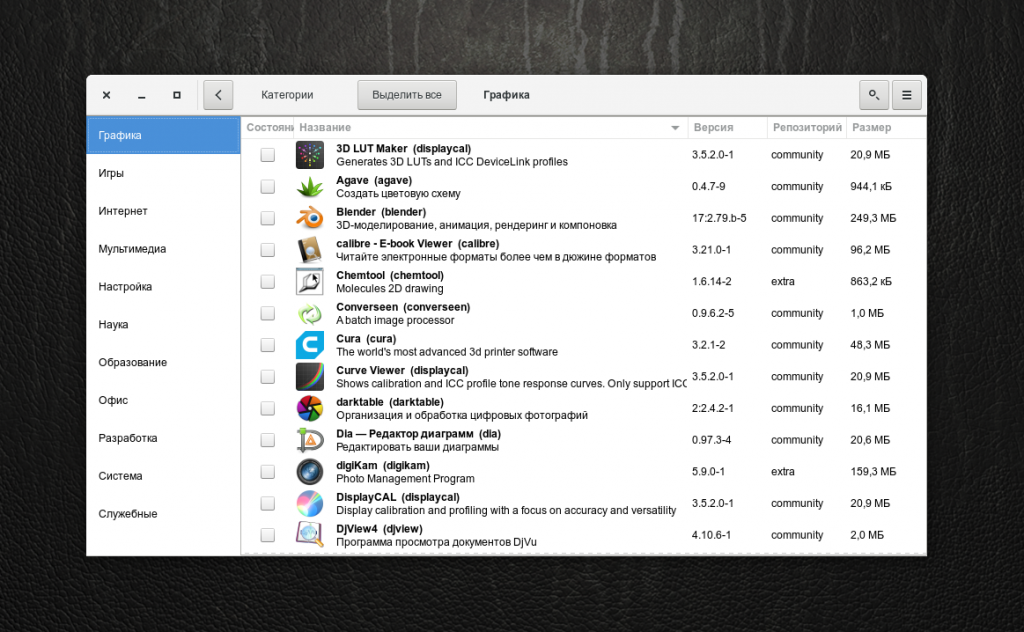
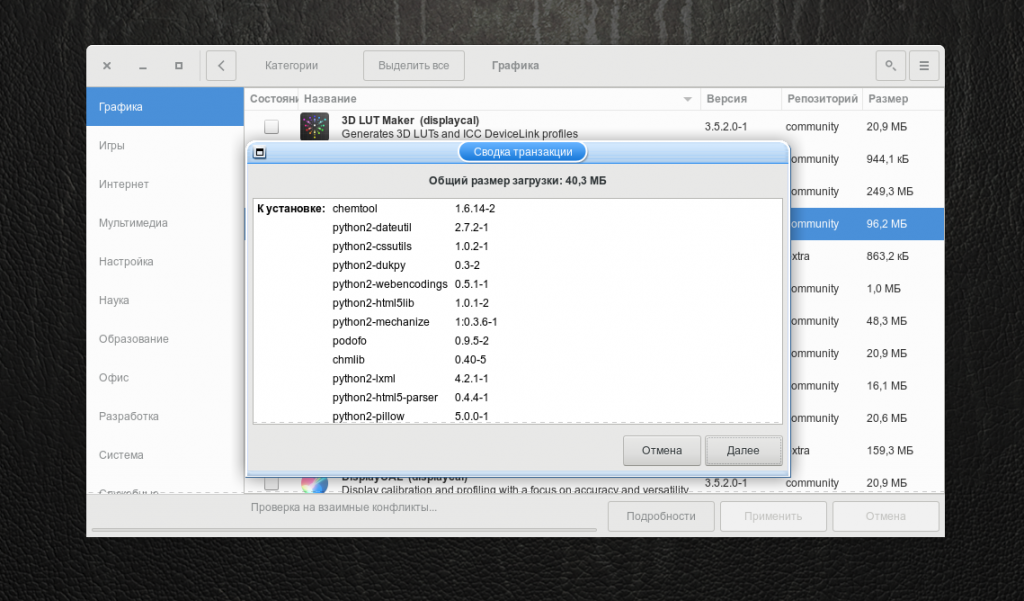
Укажите одну или несколько программ для установки, поставив галочку в поле Состояние → Применить.
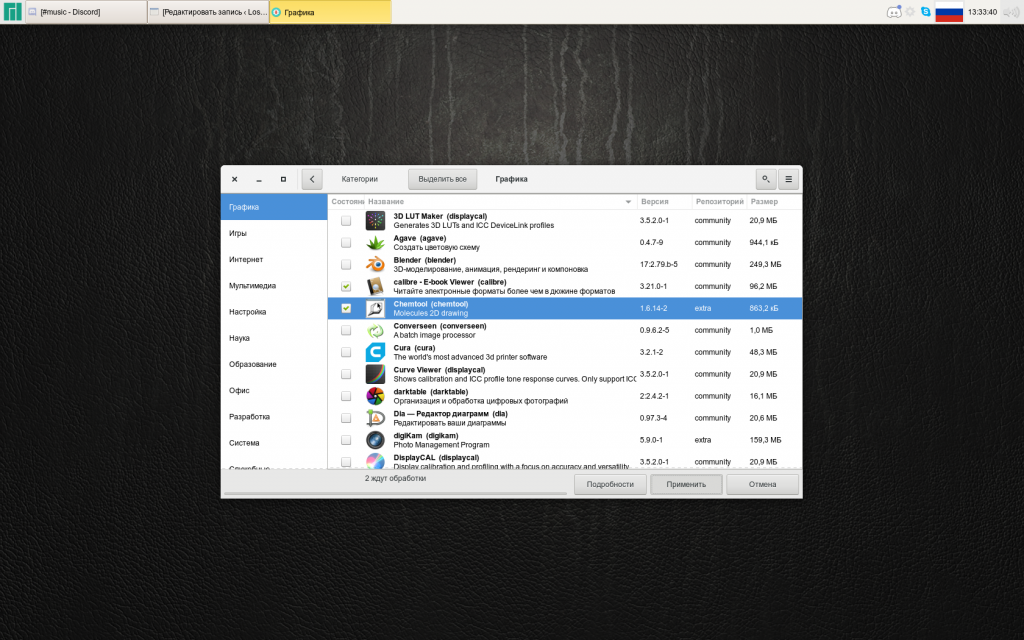
При необходимости установить дополнительные зависимости ПО, pamac выдаст соответствующее окно с полным их перечнем → Далее.
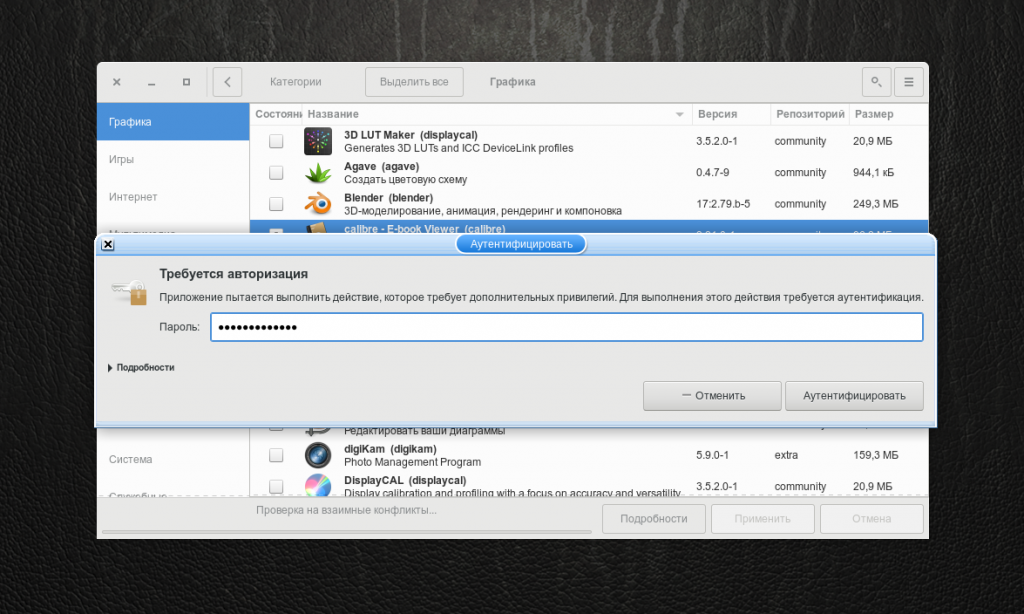
При первой попытке установки, за время работы pamac будет запрошен пароль пользователя. Введите его и нажмите Аутентифицировать.
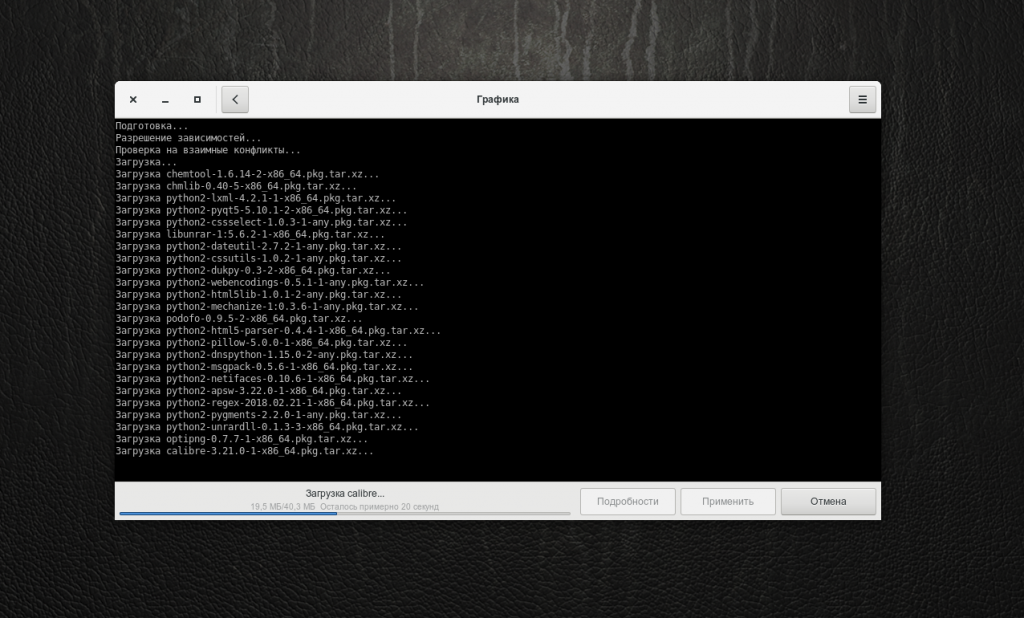
Начнётся инсталляция. Для просмотра подробностей установки нажмите кнопку Подробно.
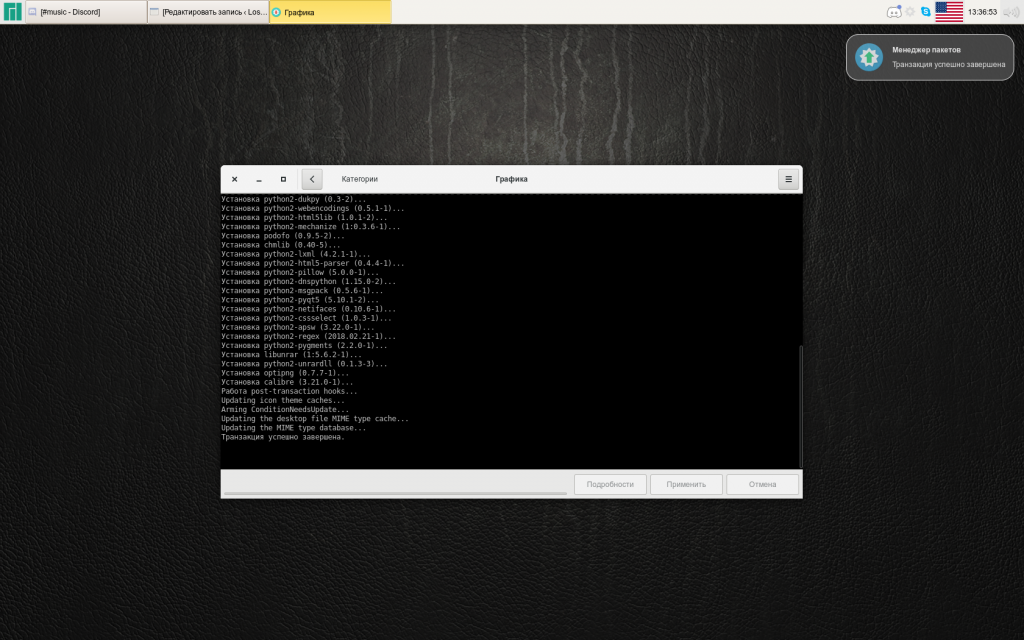
По окончании процесса появится сообщение об успешном завершении транзакции с соответствующим уведомлением.
С помощью стрелки влево вверху окна программы можно вернуться к предыдущему виду. Установленные приложения появятся в необходимом разделе меню.
Таким образом выбранные программы будут установлены в систему графически.
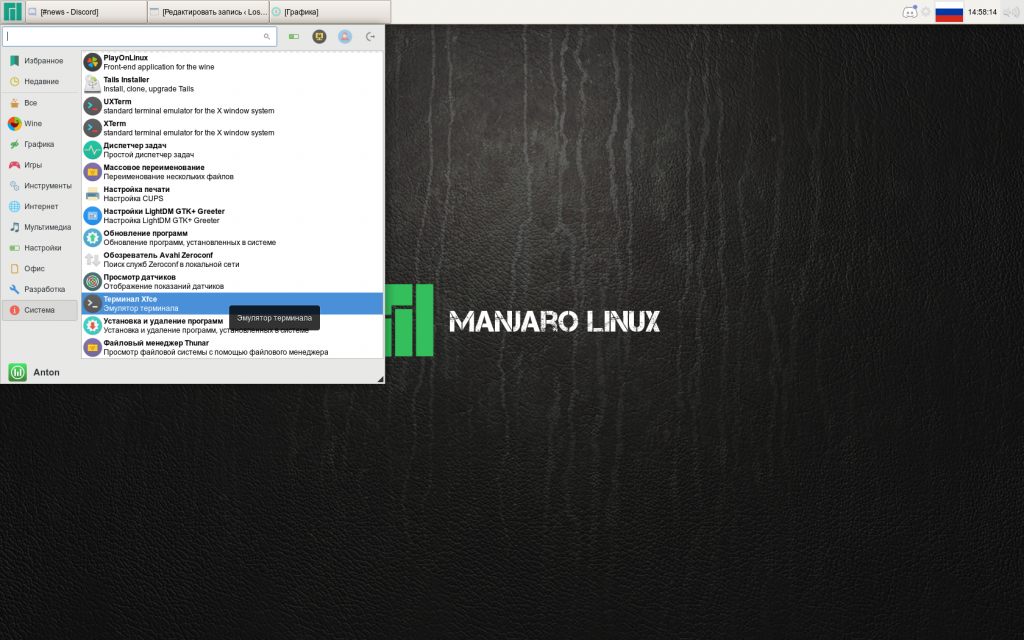
2. Установка пакетов с помощью pacman
Для инсталляции ПО в терминале используется утилита pacman. Этот метод подходит для тех, кто привык управлять установкой и удалением программ «вручную». В некоторых случаях этим способом получается совершать некоторые операции с ПО быстрее, чем в графическом варианте.
Главное отличие pacman от pamac в том, что первый не производит установку из AUR. Для этого используется утилита yaourt. Рассмотрим их по очереди.
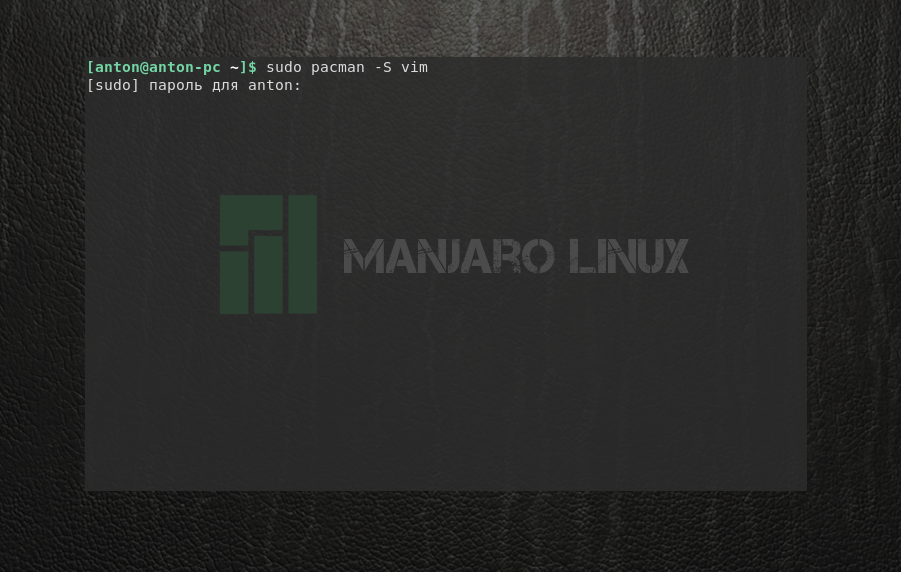
Чтобы установить программу с помощью pacman, используйте следующую инструкцию:
sudo pacman -S NAME
- sudo — выполнить команду от имени суперпользователя;
- pacman — название управляющей утилиты;
- -S — указание установить программу;
- NAME — имя программы в том виде, в каком оно указано в репозитории.
Например, чтобы установить редактор vim, откройте меню Xfce → Настройки → Терминал Xfce.
Введите команду установки и, при необходимости, подтвердите паролем.
sudo pacman -S vim
Обратите внимание, что по умолчанию ввод пароля не отображается на экране в целях безопасности.
Далее pacman предложит установить пакет в Manjaro, если его имя было введено правильно и он находится в репозитории. Чтобы подтвердить выбор, введите Y и нажмите Enter. Обратите внимание, что в данном случае регистр вводимой буквы не имеет особого значения: большая буква означает, что этот вариант будет выбран по умолчанию, если вы нажмете Enter без точного указания.
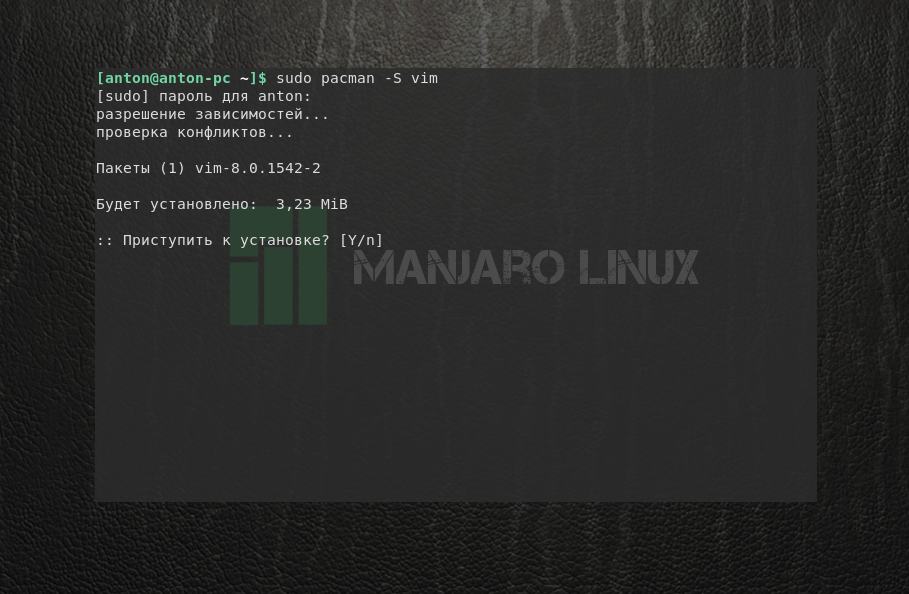
Дождитесь, пока установка программы завершится и появится приглашение ввода новой команды.
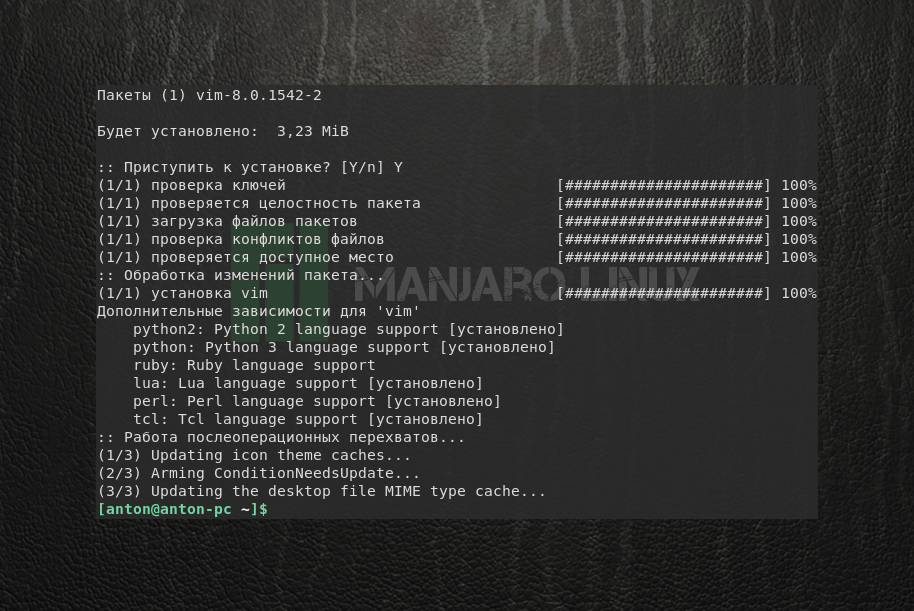
Таким образом будет установлен текстовый редактор vim.
3. Установка пакетов с помощью yaourt
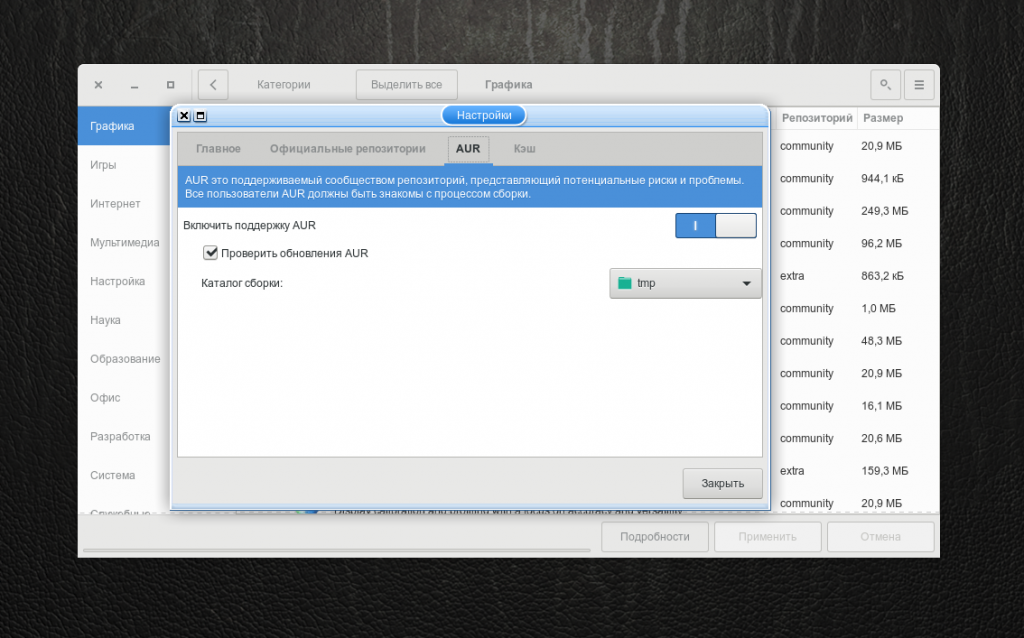
Эта утилита используется для установки приложений из пользовательского репозитория — AUR. Но по умолчанию она не установлена, так как AUR нужно включить вручную. Для этого откройте pamac. В меню программы выберите Настройки.
Во вкладе AUR включите его поддержку.
Закройте pamac. Для установки yaourt воспользуйтесь командой:
sudo pacman -S yaourt
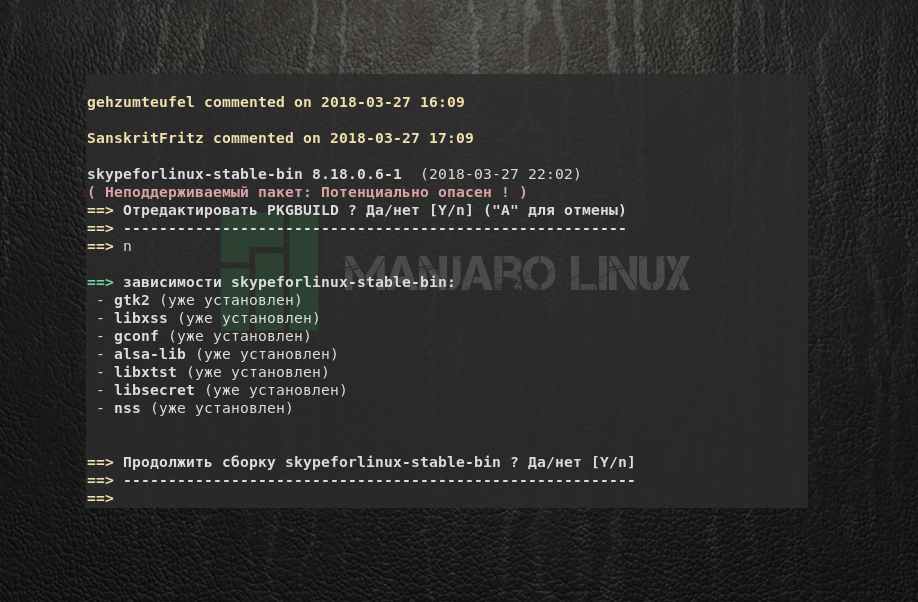
Чтобы установить приложение из AUR, используйте такую инструкцию:
yaourt NAME
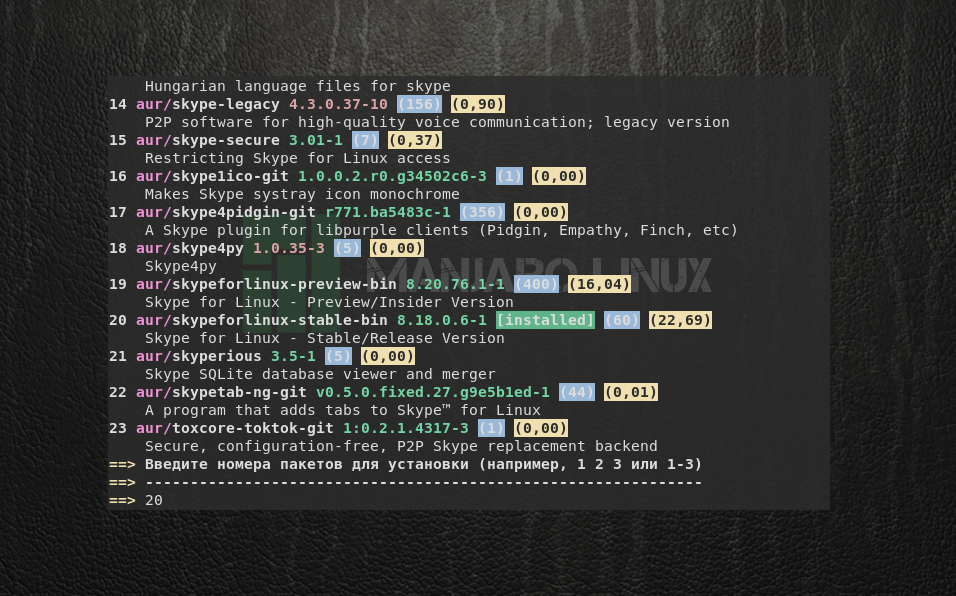
где NAME — имя устанавливаемой программы. Например, для установки программы skype введите команду:
Поскольку в AUR находится много пакетов, в названиях которых содержится skype, необходимо выбрать из списка тот, который необходим. В данном случае это пакет под номером 20. Введите его и нажмите Enter.
Далее yaourt предупредит, что вы устанавливаете выбранную программу на свой страх и риск и предложит отредактировать файл PKGBUILD, являющийся инструкцией по сборке ПО из исходного кода. На это отвечайте отрицательно буквой N. Обратите внимание, что с этого момента момента ввод буквы не требует подтверждения. Затем отобразится список устанавливаемых пакетов. Подтвердите выбор с помощью буквы Y или нажатием Enter.
Начнётся процесс скачивания и сборки пакетов. Когда программа будет готова к установке, появится соответствующий вопрос. Ответьте утвердительно.
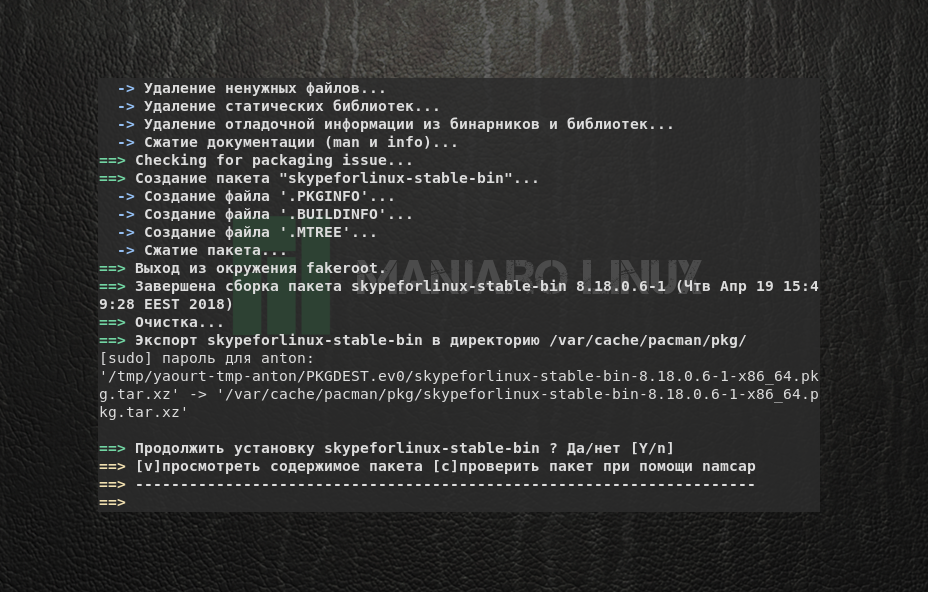
Запустится установка пакетов Manjaro, где будет показана итоговая информацию по изменению размера свободного места на диске. Подтвердите решение.
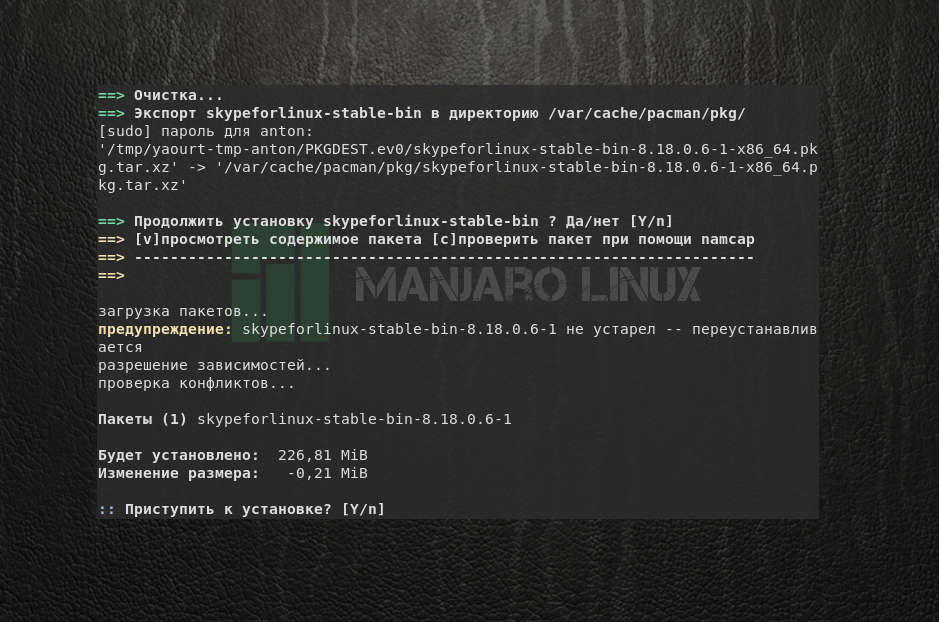
После этого программа будет установлена на компьютер и отобразится в соответствующей категории.
Выводы
Установка программ в Manjaro возможна в двух вариантах: графическом и консольном. Отличительная особенность установки в терминале – использование разных утилит для инсталляции ПО из стандартных репозиториев и AUR (а именно — pacman и yaourt).
Fontconfig is a library designed to provide a list of available fonts to applications, and also for configuration for how fonts get rendered. The FreeType library renders the fonts, based on this configuration. The freetype2 font rendering packages on Arch Linux include the bytecode interpreter (BCI) enabled for better font rendering especially with an LCD monitor. See #Fontconfig configuration and Font configuration/Examples.
Though Fontconfig is used often in modern Unix and Unix-like operating systems, some applications rely on the original method of font selection and display, the X Logical Font Description.
Contents
Font paths
For fonts to be known to applications, they must be cataloged for easy and quick access.
The font paths initially known to Fontconfig are: /usr/share/fonts/ ,
/.fonts/ , now deprecated). Fontconfig will scan these directories recursively. For ease of organization and installation, it is recommended to use these font paths when adding fonts.
To see a list of known Fontconfig fonts:
See fc-list(1) for more output formats.
Check for Xorg’s known font paths by reviewing its log:
Keep in mind that Xorg does not search recursively through the /usr/share/fonts/ directory like Fontconfig does. To add a path, the full path must be used:
If you want font paths to be set on a per-user basis, you can add and remove font paths from the default by adding the following line(s) to
To see a list of known Xorg fonts use xlsfonts , from the xorg-xlsfonts package.
Fontconfig configuration
Fontconfig is documented in the fonts-conf(5) man page.
Configuration can be done per-user through $XDG_CONFIG_HOME/fontconfig/fonts.conf , and globally with /etc/fonts/local.conf . The settings in the per-user configuration have precedence over the global configuration. Both these files use the same syntax.
/.fontconfig/*.cache-* are deprecated since fontconfig 2.10.1 (upstream commit) and will not be read by default in the future versions of the package. New paths are $XDG_CONFIG_HOME/fontconfig/fonts.conf , $XDG_CONFIG_HOME/fontconfig/conf.d/NN-name.conf and $XDG_CACHE_HOME/fontconfig/*.cache-* respectively. If using the second location, make sure the naming is valid (where NN is a two digit number like 00 , 10 , or 99 ).
Fontconfig gathers all its configurations in a central file ( /etc/fonts/fonts.conf ). This file is replaced during fontconfig updates and should not be edited. Fontconfig-aware applications source this file to know available fonts and how they get rendered; simply restarting such applications is sufficient to load the new configuration. This file is a conglomeration of rules from the global configuration ( /etc/fonts/local.conf ), the configured presets in /etc/fonts/conf.d/ , and the user configuration file ( $XDG_CONFIG_HOME/fontconfig/fonts.conf ). fc-cache can be used to rebuild fontconfig’s configuration, although changes will only be visible in newly launched applications.
Fontconfig configuration files use XML format and need these headers:
The configuration examples in this article omit these tags.
Presets
There are presets installed in the directory /etc/fonts/conf.avail . They can be enabled by creating symbolic links to them, both per-user and globally, as described in /etc/fonts/conf.d/README . These presets will override matching settings in their respective configuration files.
For example, to enable sub-pixel RGB rendering globally:
To do the same but instead for a per-user configuration:
Anti-aliasing
Font rasterization converts vector font data to bitmap data so that it can be displayed. The result can appear jagged due to aliasing. The technique known as anti-aliasing can be used to increase the apparent resolution of font edges. Anti-aliasing is enabled by default. To disable it:
Hinting
Font hinting (also known as instructing) is the use of mathematical instructions to adjust the display of an outline font so that it lines up with a rasterized grid (i.e. the pixel grid of the display). Its intended effect is to make fonts appear more crisp so that they are more readable. Fonts will line up correctly without hinting when displays have around 300 DPI.
Byte-Code Interpreter (BCI)
Using BCI hinting, instructions in TrueType fonts are rendered according to FreeTypes’s interpreter. BCI hinting works well with fonts with good hinting instructions. Hinting is enabled by default. To disable it:
Autohinter
The autohinter attempts to do automatic hinting and disregards any existing hinting information. Originally it was the default because TrueType2 fonts were patent-protected but now that these patents have expired there is very little reason to use it. It does work better with fonts that have broken or no hinting information but it will be strongly sub-optimal for fonts with good hinting information. Generally common fonts are of the later kind so autohinter will not be useful. Autohinter is disabled by default. To enable it:
Hintstyle
Hintstyle is the amount of font reshaping done to line up to the grid. Hinting values are: hintnone , hintslight , hintmedium , and hintfull . hintslight will make the font more fuzzy to line up to the grid but will be better in retaining font shape (see [2]), while hintfull will be a crisp font that aligns well to the pixel grid but will lose a greater amount of font shape. hintslight implicitly uses the autohinter in a vertical-only mode in favor of font-native information for non-CFF (.otf) fonts.
hintslight is the default setting. To change it:
Pixel alignment
Most monitors manufactured today use the Red, Green, Blue (RGB) specification. Fontconfig will need to know your monitor type to be able to display your fonts correctly. Monitors are either: RGB (most common), BGR, V-RGB (vertical), or V-BGR. A monitor test can be found here.
Subpixel rendering
Subpixel rendering is a technique to improve sharpness of font rendering by effectively tripling the horizontal (or vertical) resolution through the use of subpixels. On Windows machines, this technique is called "ClearType".
FreeType implements its own LCD-optimized rendering called Harmony. With this FreeType LCD rendering technology, the resulting output does not require additional LCD filtering, unlike Microsoft’s patented Cleartype subpixel rendering where an LCD filter is recommended. See section below on how to enable LCD filter and its benefits.
Cleartype subpixel rendering is covered by Microsoft patents and disabled by default on Arch Linux. To enable it, you have to re-compile freetype2 and define the FT_CONFIG_OPTION_SUBPIXEL_RENDERING macro, or use e.g. the AUR package freetype2-cleartype AUR .
LCD filter
When using Cleartype subpixel rendering, you should enable the LCD filter, which is designed to reduce colour fringing. This is described under LCD filtering in the FreeType 2 API reference. Different options are described under FT_LcdFilter, and are illustrated by this LCD filter test page.
The lcddefault filter will work for most users. Other filters are available that can be used in special situations: lcdlight ; a lighter filter ideal for fonts that look too bold or fuzzy, lcdlegacy , the original Cairo filter; and lcdnone to disable it entirely.
Advanced LCD filter specification
If the available built-in LCD filters are not satisfactory, it is possible to tweak the font rendering very specifically by building a custom freetype2 package and modifying the hardcoded filters. The Arch Build System can be used to build and install packages from source. This requires installation of the asp package.
Checkout the freetype2 PKGBUILD and download/extract the build files:
Enable subpixel rendering by editing the file src/freetype-VERSION/include/freetype/config/ftoption.h and uncommenting the FT_CONFIG_OPTION_SUBPIXEL_RENDERING macro.
Then, edit the file src/freetype-VERSION/src/base/ftlcdfil.c and look up the definition of the constant default_filter[5] :
This constant defines a low-pass filter applied to the rendered glyph. Modify it as needed. (reference: freetype list discussion) Save the file, build and install the custom package:
Reboot or restart X. The lcddefault filter should now render fonts differently.
Custom settings for certain fonts or font styles
The auto-hinter uses sophisticated methods for font rendering, but often makes bold fonts too wide. Fortunately, a solution can be turning off the autohinter for bold fonts while leaving it on for the rest:
Some fonts may not look good with BCI hinting. It can be disabled for just those fonts:
Replace or set default fonts
The most reliable way to do this is to add an XML fragment similar to the one below. Using the "binding" attribute will give you better results, for example, in Firefox where you may not want to change properties of font being replaced. This will cause Ubuntu to be used in place of Georgia:
An alternate approach is to set the "preferred" font, but this only works if the original font is not on the system, in which case the one specified will be substituted:
Whitelisting and blacklisting fonts
First obtain the Family name as listed in the font itself:
Then use that Family name in a stanza:
Typically when both elements are combined, is first used on a more general matching glob to reject a large group (such as a whole directory), then is used after it to whitelist individual fonts out of the larger blacklisted group.
Disable bitmap fonts
Bitmap fonts are sometimes used as fallbacks for missing fonts, which may cause text to be rendered pixelated or too large. Use the 70-no-bitmaps.conf preset to disable this behavior.
To disable embedded bitmap for all fonts:
To disable embedded bitmap fonts for a specific font:
Disable scaling of bitmap fonts
To disable scaling of bitmap fonts (which often makes them blurry), remove /etc/fonts/conf.d/10-scale-bitmap-fonts.conf .
Create bold and italic styles for incomplete fonts
FreeType has the ability to automatically create italic and bold styles for fonts that do not have them, but only if explicitly required by the application. Given programs rarely send these requests, this section covers manually forcing generation of missing styles.
Start by editing /usr/share/fonts/fonts.cache-1 as explained below. Store a copy of the modifications on another file, because a font update with fc-cache will overwrite /usr/share/fonts/fonts.cache-1 .
Assuming the Dupree font is installed:
Duplicate the line, change style=Regular to style=Bold or any other style. Also change slant=0 to slant=100 for italic, weight=80 to weight=200 for bold, or combine them for bold italic:
Now add necessary modifications to $XDG_CONFIG_HOME/fontconfig/fonts.conf :
Change rule overriding
 The factual accuracy of this article or section is disputed.
Fontconfig processes files in /etc/fonts/conf.d in numerical order. This enables rules or files to override one another, but often confuses users about what file gets parsed last.
To guarantee that personal settings take precedence over any other rules, change their ordering:
This change seems however to be unnecessary for the most of the cases, because a user is given enough control by default to set up own font preferences, hinting and antialiasing properties, alias new fonts to generic font families, etc.
Query the current settings
To find out what settings are in effect, use fc-match –verbose . eg.
Look up the meaning of the numbers at fonts-conf(5) Eg. ‘hintstyle: 3’ means ‘hintfull’
Applications without fontconfig support
Some applications like URxvt will ignore fontconfig settings. You can work around this by using
/.Xresources , but it is not as flexible as fontconfig. Example (see #Fontconfig configuration for explanations of the options):
Make sure the settings are loaded properly when X starts with xrdb -q (see X resources for more information).
Troubleshooting
Distorted fonts
If fonts are still unexpectedly large or small, poorly proportioned or simply rendering poorly, fontconfig may be using the incorrect DPI.
Fontconfig should be able to detect DPI parameters as discovered by the Xorg server. You can check the automatically discovered DPI with xdpyinfo (prov >xorg-xdpyinfo package):
If the DPI is detected incorrectly (usually due to an incorrect monitor EDID), you can specify it manually in the Xorg configuration, see Xorg#Display size and DPI. This is the recommended solution, but it may not work with buggy drivers.
Fontconfig will default to the Xft.dpi variable if it is set. Xft.dpi is usually set by desktop environments (usually to Xorg’s DPI setting) or manually in
/.Xresources . Use xrdb to query for the value:
Those still having problems can fall back to manually setting the DPI used by fontconfig:
Calibri, Cambria, Monaco, etc. not rendering properly
Some scalable fonts have embedded bitmap versions which are rendered instead, mainly at smaller sizes. Using Metric-compatible fonts as replacements can improve the rendering in these cases.
You can also force using scalable fonts at all sizes by disabling embedded bitmap, sacrificing some rendering quality.
Applications overriding hinting
Some applications or desktop environments may overr >vlc or smplayer . Use the specific configuration program for the application in such cases. For GNOME, try gnome-tweaks .
Applications not picking up hinting from GNOME settings
For instance, under GNOME it sometimes happens that Firefox applies full hinting even when it’s set to "none" in GNOME’s settings, which results in sharp and widened fonts. In this case you would have to add hinting settings to your fonts.conf file:
In this example, hinting is set to "grayscale".
Incorrect hinting in GTK applications
In some desktop environments, especially outs >xsettingsd or xsettingsd-git AUR and execute it at every system startup. See also Xsettingsd and xsettingsd wiki for more information. It can be configured with the following common configuration:
If that is not working in some other applications, you could install xorg-xrdb and provide the following configuration:
Then you can execute the script xrdb -merge
/.Xresources at every system startup to apply the options. See also X resources and #Applications without fontconfig support.
Helvetica font problem in generated PDFs
If the following command
then the bitmap font prov >xorg-fonts-75dpi is likely to be embedded into PDFs generated by "Print to File" or "Export" in various applications. The bitmap font was probably installed as a consequence of installing the whole xorg group (which is usually NOT recommended). To solve the pixelized font problem, you can uninstall the package. Install gsfonts (Type 1) or tex-gyre-fonts (OpenType) for corresponding free subsitute of Helvetica (and other PostScript/PDF base fonts).
You may also experience similar problem when you open a PDF which requires Helvetica but does not have it embedded for viewing.
FreeType breaking bitmap fonts
Some users are reporting problems (FS#52502) with bitmap fonts having changed names after upgrading freetype2 to version 2.7.1, creating havok in terminal emulators and several other programs such as dwm AUR or dmenu by falling back to another (different) font. This was caused by the changes to the PCF font family format, which is described in their release notes [3]. Users transitioning from the old format might want to create a font alias to remedy the problems, like the solution which is described in [4], given here too:
Assume we want to create an alias for terminus-font , which was renamed from Terminus to xos4 Terminus in the previously described freetype2 update:
- Create a configuration file in /etc/fonts/conf.avail/ for the font alias:
- Create a symbolic link towards it in the /etc/fonts/conf.d directory. In our example we would link as follows: ln -s /etc/fonts/conf.avail/33-TerminusPCFFont.conf /etc/fonts/conf.d to make the change permanent.
Everything should now work as it did before the update, the font alias should not be in effect, but make sure to either reload .Xresources or restart the display server first so the affected programs can use the alias.
Debugging FreeType fonts
freetype2-demos provides tools for debugging FreeType font configuration. ftview is a GUI in which you can tweak font rendering settings with a live preview. For example:
Время от времени появляются новые задачи либо необходимость в решении старых задач новыми способами — тогда возникает потребность в дополнительном программном обеспечении. Что делать, если вам нужна новая программа для Linux? Попробую описать некий алгоритм.
1. Надо понять какое именно решение вам нужно. Для этого можно использовать поисковые системы. Формировать запрос о своей проблеме и выбирать подходящие решения.
2. Теперь необходимо понять какая программа нам позволит решить эту проблему. В Linux существует большое число аналогов одних и тех же программ, и среди них надо выбрать лучшую по важному для вас критерию, например: функционал, скорость, удобство, безопасность, бесплатность. Программу ищем также в поисковой системе, но запрос формируем уже для конкретного решения проблемы.
3. После того, как мы выбрали уже конкретную программу — можно приступать к ее поиску. Открываем Synaptic и с помощью поисковой формы пытаемся найти нужное приложение. Вместе с ним мы можем обнаружить множество расширений и дополнительных модулей. Ставим все что надо — это лучший вариант. Приложения в репозиториях обычно протестированы и работоспособны.
Если приложение не найдено в репозитории, то можно поступить двумя способами — либо поискать его аналог, который присутствует в репозитории, либо найти данное приложение вне репозиториев:
1. Находим официальный сайт приложения и пытаемся найти там .deb пакет (У нас Ubuntu Linux — у него пакетная система основана на deb формате). Если такой пакет есть на официальном сайте, то скачиваем его и устанавливаем.
2. Если .deb пакета нет на официальном сайте, то ищем его в поисковой системе (помимо автора, другие люди могли для удобства собрать deb-пакет для приложения). Запрос может выглядеть так: «xneur deb» или «gimp deb».
3. Если нам не повезло и программа настолько редкая, что deb-пакета для нее нет, то смотрим в каком виде она вообще распространяется.
Установка приложения из tar.gz
Часто приложения распространяются в архивах tar.gz. Этот формат не так удобен в Ubuntu, так как это не пакет, а просто архив, в котором могут быть как исходные коды, так и скомпилированные приложения и библиотеки.
Установка из tar.gz:
1. Распаковываем архив в отдельную директорию.
2. Если есть исполняемый файл — запускаем и пользуемся, если нет — читаем раздел «Компиляция».
Установка приложения из SVN
SVN — Subversion. Это система контроля версий кода, в которых хранится исходный код приложений, особенно Open Source.
1. Создаем директорию для нашего приложения.
2. Открываем терминал в директории (cd ‘путь/к/директории’);
3. Скачиваем исходные коды:
svn co (SVN-адрес)
4. Читаем раздел «Компиляция».
Установка приложения из CVS
CVS — Concurrent Versions System. Это также система контроля версий кода.
1. Создаем директорию для нашего приложения.
2. Открываем терминал в директории (cd ‘путь/к/директории’);
3. Скачиваем исходные коды:
cvs -z3 -d (CVS-адрес) co ./
4. Читаем раздел «Компиляция».
Установка приложения из RPM
rpm-пакеты не родные для Ubuntu. Существует утилита alien, с помощью которой можно установить как обычные (sudo apt-get install alien). С ее помощью можно переконвертировать rpm-пакет в deb-пакет. Очень проста в использовании:
И в директории с rpm-пакетом появится deb-пакет. А его мы уже без труда установим.
Компиляция
1. Открываем терминал в директории с нашим приложением (cd ‘путь/к/директории’);
2. Смотрим информацию о конфигурировании приложения:
Смотрим вывод и решаем с какими параметрами надо конфигурировать. Если эта команда выдает ошибку — значит конфигуратора нет. Если конфигуратор присутствует — конфигурируем:
Можно эту команду выполнить без аргументов — будет стандартная конфигурация.
В ходе конфигурации могут быть ошибки — обычно недостаток модулей. В случае возникновения ошибок, сразу идем в поисковую систему и ищем решение.
3. Компилируем приложение:
В ходе компиляции могут быть ошибки. В случае ошибок, вам снова поможет поисковая система.
После компиляции мы получаем готовый исполняемый файл, который в большинстве случаев можно запускать и использовать.
Если приложения требует инсталляции, то выполняем (понадобятся права администратора — вспоминаем команду sudo):
Эта команда скопирует файлы приложения в необходимые системные директории.
5. Пользуемся приложением.
Приложения, установленные таким образом, могут быть удалены с трудом. Поэтому, советую почитать про программу checkinstall.
Чтобы быть в курсе моих статей, можно подписаться на RSS-канал.